![]()
In this article we explain how to install a commercial handicap low energy door opener. Low energy door openers provide equal accessibility for all pedestrians. They transform a manual door into a barrier free automatic door. For this installation we will be explaining in detail how to install the Commander low energy door opener with an outswing push arm.
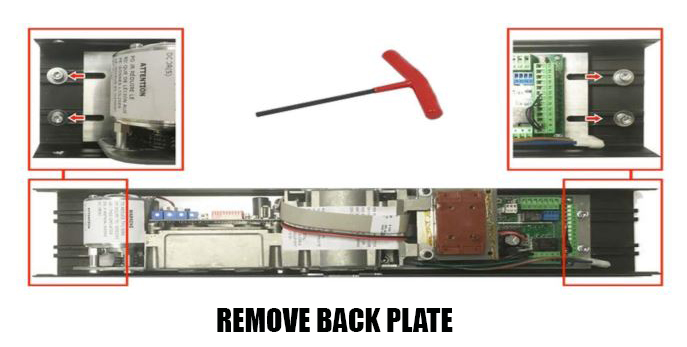
1. Remove Drive Assembly
The drive assembly consists of a motor, gearbox, and controller. All these components are attached to the door opener's back plate by 4 allen screws. Begin by removing all 4 allen screws so that the back plate is exposed.
![]()
![]()
2. Install Back Plate
All commercial grade automatic door openers install top jamb. Meaning, the door operator is designed to mount at the top of the door frame head. For a push arm style door operator, be sure to mount the back plate on the push side of the door frame. The back plate should be mounted at the top of the door frame head, and flush at the bottom. The back plate should overhang the door frame by 1.5" on each side. Self tapping screws can be used to secure the back plate to the door frame. The back plate does have pre-drilled holes, however be sure the back plate is well secured as it will be holding the weight of the drive assembly.
![]()
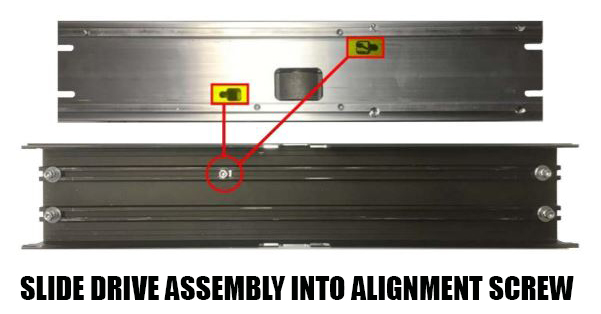
3. Re-Install Drive Assembly
Once the back plate is secured to the top of the door frame, re-install the drive assembly using the 4 allen screws we previously removed. A 5mm allen wrench can be used. On the back of the drive assembly is a key slot which is designed to slide over an alignment screw located at the center of the back plate. Please note the controller side of the drive assembly should always be towards the hinge side of the door. If not, the drive assembly is in upside down and must be rotated.
![]()
![]()
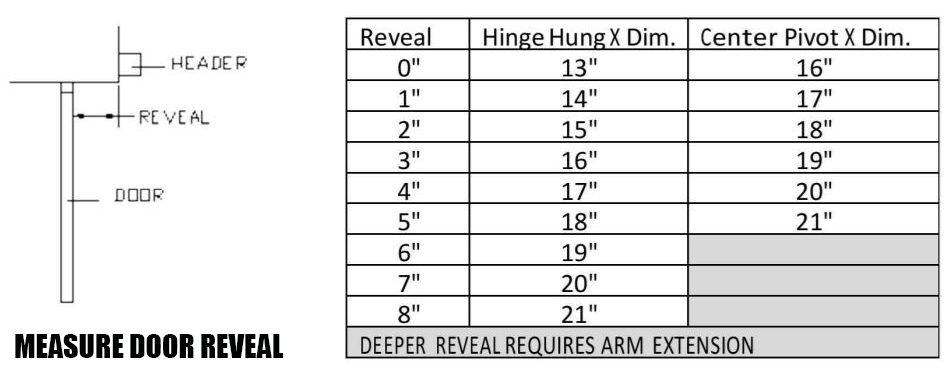
4. Determine Reveal
Reveal is the distance from the face of the door to the face of the door frame. Reveal is dependent on the door jamb width. Most commercial doors have a 5-3/4" jamb depth, however others can have jamb depths up to 8-1/4" or more. The larger the door jamb depth, the greater the reveal. The standard Commander outswing arm is suitable for reveals from 0" to 8". If the door application has a deeper reveal than 8" a special extension arm can be utilized.
![]()
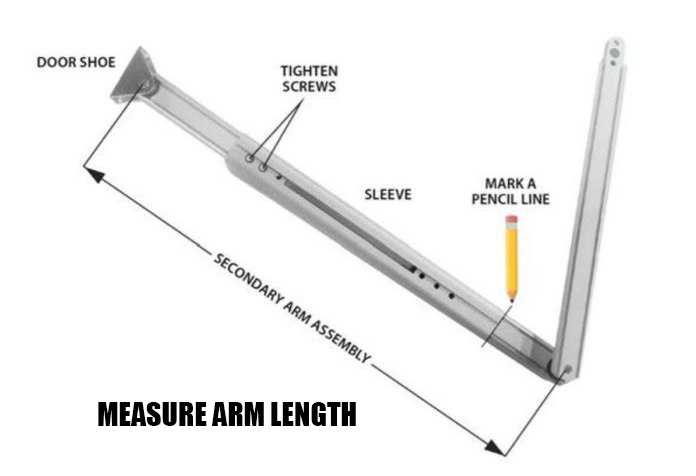
Once the reveal is determined, the telescopic arm assembly must be adjusted to the proper length. For a 0" reveal the telescopic arm should be adjusted to 13". For each inch of reveal, the telescopic arm would need to be adjusted an additional inch. For example, a 1" reveal would require an arm length of 14", and so on. We recommend laying the arm out on a table or the floor when a measuring the arm length. Once the desired arm length is found, mark the location on the arm with a pencil. Do not tighten the screws in the arm to secure the arm length yet.
![]()
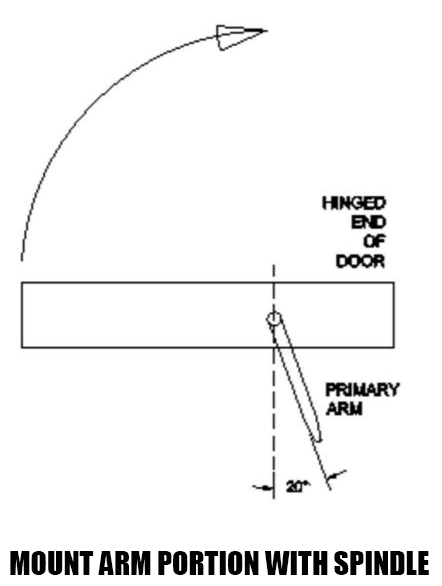
5. Mount The Arm
Mount the arm portion with the spindle on to the door opener's gearbox. To do this be sure to attach the arm 20 degrees past perpendicular towards the hinge side of the door. This will allow you to preload the spring later on.
![]()
Next, mount the door shoe onto the door. The door shoe should be mounted 13.5" from the inside door hinge jamb.
![]()
Join both arms together and line up the telescopic arm so it is at the length you marked previously with the pencil mark. You will feel resistance as you push the main arm assembly towards the telescopic arm as you are preloading the internal fire spring within the door opener's gearbox. Secure the arm screws so that the arm is now one piece and secure.
![]()
6. Connect Main Power
The Commander door opener is 120VAC, Single Phase, 60 Hz. Connect the line voltage, neutral, and ground. Be sure the door opener is "off" before making power connection.
![]()
7. Connect Other Door Opener Accessories
At this time you can connect your other door opener accessories such as wireless activation switches, touchless activation switches, safety sensors, electric strike locks, etc.
8. Perform The Learn Cycle
We are now ready to do the learn cycle or initial set up. This process allows the microprocessor controller to measure the door weight and size of the door, then automatically setup it's parameters for that door size. When the learn cycle occurs there should be no obstructions in the path of the door swing. The door should not be touched when the learn cycle occurs. If the learn cycle is interrupted, you will have to start over from the beginning.
![]()
First, turn the door opener "on". Next identify SW1 push button switch on the controller. Press and hold it for about 5 seconds. Once you notice the red LED (LD2) flashing rapidly, you may release SW1 push button. The door will slowly open, recycle partially, close, and then reopen.
Once the door is completely closed, the learn cycle is complete and you can test the door operation by using your activation switch. Always be sure to verify that the speed and closing adjustments are suitable for your door application.
The Commander low energy door opener is by far the easiest door opener to install due to the simplistic design and self tuning / self learn set up. If you need an automatic door opener, then the Commander automatic swing door operator is the best choice. Order today and receive FREE shipping!