
Introduction
Thank you for choosing Automatic Door and Hardware for your storefront door needs. In this installation guide, we will provide you with detailed instructions on how to properly install a standard storefront door and frame. By following these steps, you can ensure that your door functions properly, providing a safe and secure entrance to your business.
Tools Needed
Before beginning the installation process, make sure you have the following tools:
- Power drill
- Level
- Tape measure
- Phillips head screwdriver
- Flathead screwdriver
- Hammer
- Chisel
- Safety glasses
- Gloves
Having the proper tools on hand before starting the installation process will make the installation easier and more efficient.
Measuring Your Opening
The first step in the installation process is to measure the opening where the door will be installed. Measuring the opening accurately is crucial to ensuring the door fits properly and functions correctly. Your storefront door should be 1/2" less than the overall rough opening width and 1/4" less than the rough opening height.
Here are the steps to follow:
- Using a tape measure, measure the width and height of the opening. Measure both the inside and outside of the frame to ensure accuracy. Verify your door and frame will fit inside of the opening.
- If the opening is not square, make note of which side is longer or shorter, and fix the opening appropriately.
Preparing the Door Frame
Before installing the door frame, there are a few things you need to do:
- Remove any packing materials from the door frame, including any protective plastic.
- The door frame will consist of 3 components, the lock stile, hinge stile, and head.
- On the stile components, a frame bracket will be attached. Slip the head component over the hinge or lock stile component frame bracket. The head bracket should be perpendicular to the hinge or lock stile.
- Fasten the head bracket to the frame brackets.
Installing the Door Frame
Now that you have prepared the door frame, it's time to install it. Follow these steps:
- Position the frame in the opening and make sure it is level. Use shims to adjust the frame as necessary.
- Once the frame is level and in the correct position, secure it to the wall using screws. Be sure to screw into the framing and not just the drywall or plaster.
- Check again to ensure the frame is level and square. Adjust as necessary.
Door Installation
With the frame securely in place, it's time to attach the door.
Attaching the Door to the Frame
Follow these steps to attach the door to the frame:
1. In cases where intermediate pivots are required, it's important to retract the intermediate pivot pin to allow the door pivot to clear. To do this, start by removing the bottom hole plug and retracting the pivot pin. Once the door is in place, raise the pivot pin to engage the door pivot and adjust it to a "just snug" position before reinstalling the bottom hole plug.
To set the door, begin by retracting the frame intermediate pivot pin to allow the door pivot to clear. Next, set the door onto the bottom pivot and push the top pivot pin into the retracted position. Then, locate the top door pivot under the frame and release the pin. By following these steps carefully, you can ensure that the door is properly installed and will operate smoothly for years to come.
2. Place the door onto the lower pivot and retract the top pivot pin. Find the top door pivot below the frame and release the pin.
3. Modify the door clearance by rotating the pivot pin in a clockwise direction to lower the door and counterclockwise to elevate the door. Once the final adjustment is done, use a hex key wrench to securely tighten the set screw. The clearance between the top rail of the door and the frame should be 1/8".
Check that the door opens and closes smoothly.
4. In case you need to uninstall the door for maintenance purposes, to hold the spring-loaded retaining pin in place, position a screwdriver on it at the top pivot and slide the pin into the notch. Follow the same process as the installation to remove the door.
Adjusting The Door
1. With the door open, insert a wedge on the lock side of the door until the clearance at the top of the door is even.
2. To raise or lower a corner, turn the glass jack screw clockwise or counterclockwise, respectively.
3. Close the door and check for consistent clearances across the top of the door. Adjust as necessary.
Note: To avoid breaking the glass, ensure that the door's weight is properly supported so that the screw can turn without difficulty. If the door clearance is significantly uneven, it may be necessary to remove the glass stops and glass blocking to make adjustments.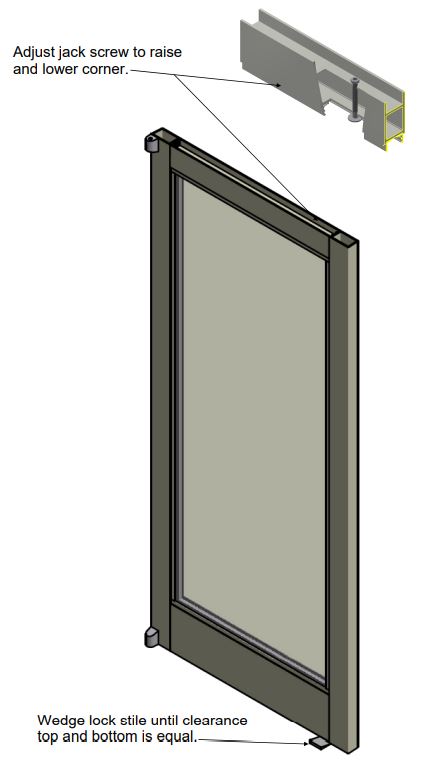
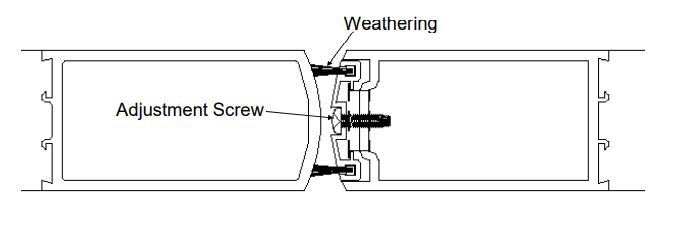
For Pairs Of Doors
1. Set the initial weathering clearance to 1/8" by adjusting the center screw.
2. Regularly check and adjust the weathering clearance as necessary throughout the lifespan of the door.
Glazing The Door
It is crucial to note that these instructions are specifically for glazing a door that does not have a mid rail. If the door being glazed has a mid rail, it is recommended to glaze the lower section of the door first by following the steps below. After that, glaze the upper section by repeating the same steps.
Additionally, it should be emphasized that the steps mentioned below are based on the assumption that the door frame has been installed in a plumb and accurate manner and has been adequately secured for the intended use.
1. When installing a glass unit in a hinged door leaf, ensure that the door leaf is square. Securely block or clamp the door leaf as required. Ensure that the glass jack is backed off to avoid interference with the glass unit installation.
2. Install the interior glass stops, ensuring that the verticals run through the installed glazing gasket.
3. Place two glass setting blocks at the bottom rail to support the glass unit.
4. Position the glass unit in the door leaf, pressing it firmly against the interior glazing gaskets and stops.
5. Block the glass unit all around to maintain consistent spacing between the glass and aluminum, usually 3/16". Use the glass jack to firmly secure the glass unit in place.
6. Remove any excess clamps or blocks and check that the door is square. Make adjustments to the blocking as needed to accommodate any discrepancies. Close the door and check the clearance between the door and frame all around.
7. Install the exterior glass stops, ensuring that the horizontals run through the installed glazing gasket.

Installing Door Lock
Install Door Closer
Finishing Touches
Follow these final steps to complete the installation:
- Install the door handle and lock according to the manufacturer's instructions.
- Test the door to ensure it opens and closes smoothly and latches securely.
- Apply weatherstripping around the door frame to prevent air and water infiltration.
- Apply a coat of paint or finish to the door and frame to protect them from the elements.
Congratulations! You have successfully installed your standard storefront door.
Conclusion
Installing a standard storefront door may seem like a daunting task, but by following these step-by-step instructions, you can ensure that your door is installed properly and functions smoothly. If you have any questions or need further assistance, don't hesitate to contact Automatic Door and Hardware for help.

